Filming Day One

Day one of filming took place on November 16th 2017. I planned to film the short introduction to my music video. For these shots I traveled to Kew Gardens and Richmond Park with my mum as they both have a good natural landscape. Before leaving I ensured that my camera battery was fully charged up as I didn’t want it to die half way through filming. I also made sure that I had cleared my SD card of any other photos or videos that were on the card to make room for my own work. As we were traveling up to London I checked the train lines the night before and in the morning for any delays or cancellations on the district line and metropolitan line. Knowing this would prevent me from losing time for filming. 

Once I was up in Kew Gardens I had to pay an entry fee of £11 to access the grounds of he park. Following my storyboard closely I looked for different kinds of flowers to film as they would conform to the naturalistic conventions of the indie-acoustic/folk genre. To have a wide range of shots I also tried filming inside the green houses however, once inside they fogged up my camera making it difficult to see anything clearly. This plan was then abandoned. I walked around the gardens filming colourful trees and flowers and stumbled across a pond in the centre of the park. Here I was able to capture footage of the swans which breaks up the footage of plants with something that is still considered natural. Towards the end of my time at Kew Gardens I filming a peacock on the grass. Although this wasn’t something I was expecting to include in my film I though the shot looked good and fitted with the footage as a whole. 

Me and my mum then moved on to Richmond Park to film some of the deer. Unfortunately, we had lost track of time and spent too long in Kew Gardens that we didn’t have a lot of time left. Additionally, the lighting was getting dark which meant that any of the footage that I filmed may have stuck out compared to the other film. We then made a decision to leave as I already had footage of some of the animals in Kew which I could substitute. 

Overall, I am very happy with my first filming day as I believe that i have a wide range of shots and mis en scene. However, if I were to film this again I would ensure that I managed my time better so that I was able to film in Richmond Park. 
 

Poster Planning And Mock Ups

Introduction:

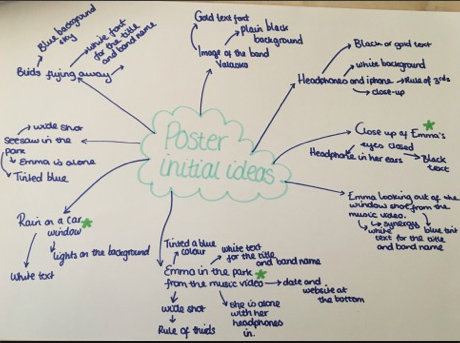
When choosing the music video brief I understood that as well as making a music video I would also have to make a poster. I, therefore, researched music video posters in the indie-acoustic/folk genre. From my research, I found that there are an equal amount of portrait based posters to landscape based posters, many of them use the rule of thirds and they either contain the band/singer or some form of nature. With all this in mind, I decided to create a mind map of my initial ideas using my research as inspiration.

Mindmap: 

When coming up with ideas I ensured that I kept what I had learnt from my research in mind, however, I also considered challenging the typical conventions of music posters. I thought of doing this as 

After coming up with as many ideas a possible I circled the top five that I liked in black pen. 

Screen Shot 2018-02-14 at 9.59.22 am.png


Mock Up No. 1:

Screen Shot 2018-02-14 at 2.04.15 pm.png

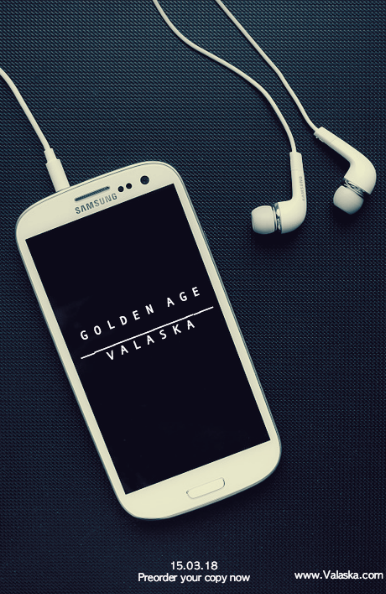
Although I orginially wanted to have a close up of Emma’s eyes as one of my mock ups I eventually decided that the phone would be a better option. The first mockup I created features a phone and a pair of headphones. Both props link to my music video as they are the device that my protagonist Emma uses to escape from her reality. Bringing this prop into the poster will allow me to create synergy as it links to my music video. Additionally, from my research about real music video posters, I have come to the conclusion that the rule of thirds is a technique often use. I wanted to use this in my own poster to display a conformity to this convention, however, this isn’t displayed in the mock-up as the image I found wasn’t positioned this way. Personally, I really like the way this mockup turned out as I think it looks very professional and the album and band name looks like it’s part of the phone.

Mock Up No. 2:

Screen Shot 2018-02-14 at 1.56.11 pm.png

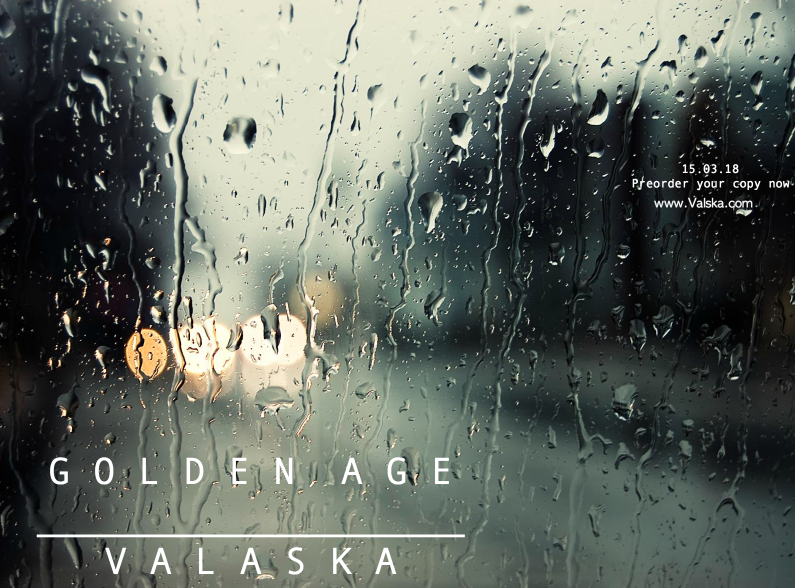
My second mockup is of the rain on a car window idea. I have positioned my text in the bottom left corner so that it contrasts the darker areas of the image. Additionally, I have also added in the date of release and the band website. This idea links to my music video as there is a scene where Emma looks out of her bedroom window to a rainy view. Furthermore, the fact that this poster is placed in a car suggests towards the idea of being free and escaping. Personally, I think this mock is good but I still prefer the first idea over this one. 

Mock Up No. 3:


Screen Shot 2018-02-14 at 1.49.52 pm.png

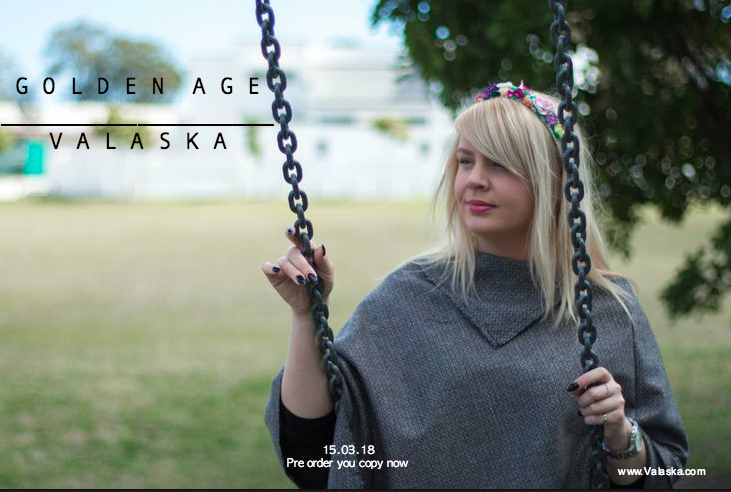
The third digipack idea is of Emma on a swing in the park. Again I have tried to create synergy across my music video and poster as this makes the overall three products look professional. In this mock-up, I have used white text as this contrasts the colours presented in the image used. I have also used black for the title font as I wanted this to be the text that stands out the most. This is also why the titles are the biggest on the page. Furthermore, having a wide or mid-shot of Emma on the swing and using the rule of thirds will make my poster similar to the posters I analysed in my research stages. Personally, I think this idea has potential, however, I am still in favour of my first mockup as it not only looks the most put together but also will require me to not work with actors which could hinder my time management. 

My Chosen Digipack Idea: 

Upon assessing my three mock-ups I have chosen the first idea and will proceed to develop this using my own photography. I have chosen this idea as it is :

  • Professional
  • Put together
  • Provides synergy with my music video
  • Requires no actors
  • Won’t have too many colours that contrast

Summary Of My Primary Research and Planning

Screen Shot 2018-03-11 at 11.36.47 am

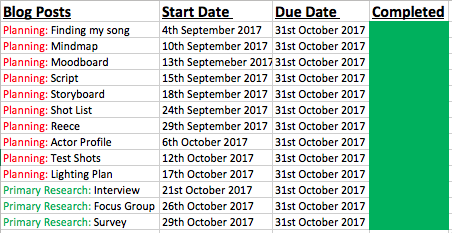
Over the past few months, I have been planning all the different aspects of my music video. I’ve learnt how to create a shot list, storyboard and an animatic by myself which is something I initially thought would be very challenging. However, my research into how to professionally create them has helped my outcome look as best as possible. Although drafting up script and lighting plans has at times been very tedious I can be certain that this planning will help me when I come to film my music video.  To help with my time management I used a gantt chart with all my different tasks that needed to be completed and their deadlines. I personally, felt that this was very helpful in keeping me on track for my blogs. Currently, I feel very prepared for my idea and plan to make a filming schedule for my piece.

Using iMovie

Introduction:

For editing my music video I plan to use the software iMovie. As I haven’t make a project as big as a music video on iMovie before I wanted to explore the features its had and get used to using the programme. To do this I filmed my local firework display and edited it to make a montage of clips. Below is the result. 


YouTube Tutorial:

To gain a better understanding of how to use the iMovie software I decided to watch this YouTube tutorial. It covers all the basic steps of creating a project and talks about using the effects and even talks about how to export a project. This was very helpful for me as it explained everything in an easy to understand format.


Firework Montage:


Overview:

Overall, I think that using iMovie to create a video will be the best option for me. I found the majority of its features very easy to use and the layout of the programme is simple to work with. Furthermore, it also has some very interesting effects which I may consider using in my music video. Additionally, I found the tutorial on Youtube very helpful. It explained the basics of iMovie in a way that was clear for me to understand. In regards to the video itself, I am happy with the finished result as I was able to use a wide variety of the software features. iMovie will be my editing software of choice when it comes to the editing stages of my music video. 

Uses and Gratifications Theory

The Uses and Gratifications Theory was devised by Blumler and Katz in 1974. It states the main reasons why the mass audience consume media products.

Definition:

Uses and Gratifications Theory is a popular approach to understanding mass communication. The theory places more focus on the consumer, or audience, instead of the actual message itself by asking “what people do with media” rather than “what media does to people” (Katz, 1959) . It assumes that members of the audience are not passive but take an active role in interpreting and integrating media into their own lives. The theory also holds that audiences are responsible for choosing media to meet their needs. The approach suggests that people use the media to fulfil specific gratifications. This theory would then imply that the media compete against other information sources for viewers’ gratification. (Katz, E., Blumler, J. G., & Gurevitch, M. 1974)

There are many ways audiences contribute to this theory. These are:

  • Identification: Audiences may identify with certain characters in tv shows or films. Their storylines may relate to the audience’s real life problems which offers a comfort that they aren’t alone. Some audiences also see these characters as role models. 
  • Education: Audiences may consume media products such as documentaries to obtain new knowledge about the world. The news is also a good example of this. 
  • Entertainment: Many audiences use media products as a way of escaping their mundane reality. Becoming immersed in a product offers them some relief from their stresses and worries. 
  • Social Interaction: Some people engage with media products as a way of starting social interaction. For example, audiences may watch The X Factor or The Voice to discuss the show and communicate their opinions on it. 

My music video will focus on audiences using media products for entertainment purposes. To explore more into this side of the theory I have looked it in more detail. Below are some of the types of gratification audiences may feel when engaging with a media text for entertainment purposes:

  • Mood Management: Audiences may use media texts to help with their mood. Music  is a good example for this. If someone is feeling sad they may listen to happy music to cheer them up. 
  • Affective Disposition: Audiences enjoy supporting characters that have good morals and feel a personal connection to them when bad things happen. 
  • Excitation Transfer: Audiences like to feel worried about good characters as when they are rewarded audiences feel happier. 
  • Sensation Seeking: Audiences may seek excitement through watching intense media texts such as action films. 
  • Intrinsic Motivation: Audiences using media to challenge their media-reflated skills.
  • Mood Adjustment: Audiences may adjust their mood to a certain situation. If they are in a sad mood they may listen to sad music. 
  • Relationship Functions of Entertainment: Audiences may use media texts to escape from real life relationships. 
  • Parasocial Relationship: Audiences becoming attached to characters.
  • Vicarious Experiences: Audiences living through a characters and imagining being them.
  • Download Social Comparison: Audiences enjoy viewing characters who are similar or worse off than ourselves. 
  • Eudemonic Motivation: Audiences may engage with media texts to gain a deeper meaning for life, find beauty and understand how people think and feel. 

Relation To My Own Work:

I have decided that the uses and gratifications theory relates very heavily to my own media project. My narrative involves a girl called Emma who uses music to escape her reality. Upon looking at the ways in which media can be used to gratify people it is evident that my character Emma would be using music for entertainment purposes; in particular escapism. The audience watching my music video may also feel some gratification from watching as it may give them eudemonic motivation. 


References:

https://en.wikipedia.org/wiki/Uses_and_gratifications_theory#Related_theories


Animatic Research And Plan

Introduction:

Having an animatic will help me to see how my music video will look as a final product. The combination of my storyboard and my song put together will allow for a better insight into how the shots will look accompanied by the music and will allow me to make any changes necessary. 


How To Create An Animatic:

When researching how to create a professional animatic I stumbled across this YouTube video. Personally, I like to form of YouTube videos as a source of help as I learn best in visual and audio formats. This video was of great use to me as it covered the basics of an animatic and how to put one together from your storyboard.

From this video, I have learnt that:

  • An animatic should include the shot type
  • An animatic should include the action that will take place
  • An animatic should be edited so that it matches the speed at which you will edit the actual music video. 

Examples Of Animatics:

I next went on to find some examples of animatics that I could watch to see how a professional example would look. This is as I wanted my own to be the best it could possibly be. Although as previously stated many professional animatics use drawing software and tools online I do not have the funds to do so. I have also included one that does use this software to get a sense of the professionalism in terms of editing and framing.

This first example I found is an animatic to a song called ‘The Schuyler Sisters’ from the hit musical Hamilton. In this example, the editor has used a professional drawing software on their computer. As I am a student I cannot afford this kind of programme, however, I was able to take away the editing and framing techniques used in this. In my own work, I also plan to include the same kind of editing that I will use in my own music video. This will help me to have a guide in terms of editing. 

As the majority of animatics on Youtube are presented through drawing software I decided to look at one that wasn’t. This example is a student’s a2 media animatic for the song ‘The Struggle’. Looking at a work created by someone is in a similar position to me helps my research to be tailored to my situation. In the animatic, the artist has hand drawn each scene and taken a photo of each shot. They have also edited it so that it is in time with the music. I plan to do the same with my own animatic. 


My Animatic:

Overall, I am very pleased with the turn out of my animatic. I believe I have been able to incorporate the information from my research very well into the final product. having this animatic will be a useful tool for me to refer to when it comes to filming and editing my music video as it is the outline for the final production.

Focus Group For My Idea

I recently made a powerpoint to showcase my idea to my classmates and to my friends outside of school. From this, I wanted to assess the strengths and improvements that could be made to my idea so that I reach the top band. Many people said that my idea was very creative and thought it was an area that would be interesting to broadcast as it isn’t discussed in mainstream media. Virtually none of my focus group participants had any improvements for my idea which I am happy about as it shows I have properly thought about every aspect.